\(
\newenvironment {prompt}{}{}
\newcommand {\accordion }[0]{}
\newcommand {\ungraded }[0]{}
\newcommand {\xmDefaultPreamble }[0]{xmPreamble.tex}
\newcommand {\xmDefaultPrintstyle }[0]{xmPrintstyle.sty}
\newcommand {\todo }[0]{}
\newcommand {\oiint }[0]{{\large \bigcirc }\kern -1.56em\iint }
\newcommand {\mooculus }[0]{\textsf {\textbf {MOOC}\textnormal {\textsf {ULUS}}}}
\newcommand {\tkzTabSlope }[1]{\foreach \x /\y /\z in {#1}{\node [left = 3pt] at (Z\x 1) {\scriptsize $\y $}; \node [right = 3pt] at (Z\x 1) {\scriptsize $\z $}; }}
\newcommand {\RR }[0]{\mathbb R}
\newcommand {\R }[0]{\mathbb R}
\newcommand {\N }[0]{\mathbb N}
\newcommand {\Z }[0]{\mathbb Z}
\newcommand {\sagemath }[0]{\textsf {SageMath}}
\newcommand {\d }[0]{\,d}
\newcommand {\l }[0]{\ell }
\newcommand {\ddx }[0]{\frac {d}{\d x}}
\newcommand {\zeroOverZero }[0]{\ensuremath {\boldsymbol {\tfrac {0}{0}}}}
\newcommand {\inftyOverInfty }[0]{\ensuremath {\boldsymbol {\tfrac {\infty }{\infty }}}}
\newcommand {\zeroOverInfty }[0]{\ensuremath {\boldsymbol {\tfrac {0}{\infty }}}}
\newcommand {\zeroTimesInfty }[0]{\ensuremath {\small \boldsymbol {0\cdot \infty }}}
\newcommand {\inftyMinusInfty }[0]{\ensuremath {\small \boldsymbol {\infty - \infty }}}
\newcommand {\oneToInfty }[0]{\ensuremath {\boldsymbol {1^\infty }}}
\newcommand {\zeroToZero }[0]{\ensuremath {\boldsymbol {0^0}}}
\newcommand {\inftyToZero }[0]{\ensuremath {\boldsymbol {\infty ^0}}}
\newcommand {\numOverZero }[0]{\ensuremath {\boldsymbol {\tfrac {\#}{0}}}}
\newcommand {\dfn }[0]{\textbf }
\newcommand {\unit }[0]{\mathop {}\!\mathrm }
\newcommand {\eval }[1]{\bigg [ #1 \bigg ]}
\newcommand {\seq }[1]{\left ( #1 \right )}
\newcommand {\epsilon }[0]{\varepsilon }
\newcommand {\phi }[0]{\varphi }
\newcommand {\iff }[0]{\Leftrightarrow }
\DeclareMathOperator {\arccot }{arccot}
\DeclareMathOperator {\arcsec }{arcsec}
\DeclareMathOperator {\arccsc }{arccsc}
\DeclareMathOperator {\si }{Si}
\DeclareMathOperator {\scal }{scal}
\DeclareMathOperator {\sign }{sign}
\newcommand {\arrowvec }[1]{{\overset {\rightharpoonup }{#1}}}
\newcommand {\vec }[1]{{\overset {\boldsymbol {\rightharpoonup }}{\mathbf {#1}}}\hspace {0in}}
\newcommand {\point }[1]{\left (#1\right )}
\newcommand {\pt }[1]{\mathbf {#1}}
\newcommand {\Lim }[2]{\lim _{\point {#1} \to \point {#2}}}
\DeclareMathOperator {\proj }{\mathbf {proj}}
\newcommand {\veci }[0]{{\boldsymbol {\hat {\imath }}}}
\newcommand {\vecj }[0]{{\boldsymbol {\hat {\jmath }}}}
\newcommand {\veck }[0]{{\boldsymbol {\hat {k}}}}
\newcommand {\vecl }[0]{\vec {\boldsymbol {\l }}}
\newcommand {\uvec }[1]{\mathbf {\hat {#1}}}
\newcommand {\utan }[0]{\mathbf {\hat {t}}}
\newcommand {\unormal }[0]{\mathbf {\hat {n}}}
\newcommand {\ubinormal }[0]{\mathbf {\hat {b}}}
\newcommand {\dotp }[0]{\bullet }
\newcommand {\cross }[0]{\boldsymbol \times }
\newcommand {\grad }[0]{\boldsymbol \nabla }
\newcommand {\divergence }[0]{\grad \dotp }
\newcommand {\curl }[0]{\grad \cross }
\newcommand {\lto }[0]{\mathop {\longrightarrow \,}\limits }
\newcommand {\bar }[0]{\overline }
\newcommand {\surfaceColor }[0]{violet}
\newcommand {\surfaceColorTwo }[0]{redyellow}
\newcommand {\sliceColor }[0]{greenyellow}
\newcommand {\vector }[1]{\left \langle #1\right \rangle }
\newcommand {\sectionOutcomes }[0]{}
\newcommand {\VerbMathToks }[2]{\alteqtoks {\begin {#2} #1 \end {#2}}}
\newcommand {\DeclareMicrotypeVariants }[1]{}
\newcommand {\DeclareMicrotypeAlias }[2]{}
\newcommand {\LoadMicrotypeFile }[1]{}
\newcommand {\DeclareMicrotypeFilePrefix }[1]{}
\newcommand {\DeclareMicrotypeBabelHook }[2]{}
\newcommand {\microtypesetup }[1]{}
\newcommand {\microtypecontext }[1]{}
\newcommand {\textmicrotypecontext }[2]{#2}
\newcommand {\leftprotrusion }[1]{#1}
\newcommand {\rightprotrusion }[1]{#1}
\newcommand {\noprotrusionifhmode }[0]{}
\newcommand {\lsstyle }[0]{}
\newcommand {\lslig }[1]{#1}
\newcommand {\maketitle }[0]{}
\newcommand {\problem }[0]{ }
\newcommand {\exercise }[0]{ }
\newcommand {\question }[0]{ }
\newcommand {\exploration }[0]{ }
\newcommand {\dialogue }[0]{\begin {description}}
\newcommand {\GetTranslation }[1]{#1}
\)
Aproxime \(\sqrt {9.5}\) à mão usando a ideia de aproximação linear (de uma função e de
um ponto base convenientemente escolhidos). Usando a segunda derivada,
explique se essa é uma estimativa por falta ou uma estimativa por excesso.
xmhint
O número que você precisa aproximar deve ser expresso como
Se \(f(x) = \sqrt {9.5}\) para \(f(x) = \sqrt {x}\), então devemos usar \(x=9.5\). Isto é, estamos tentando aproximar \(f(9.5)\).
xmhint
Agora você vai aproximar \(f(9.5) = \sqrt {9.5}\) usando \(L(x)\), a aproximação linear de \(f\) em \(a\). Em outras
palavras, \(\sqrt {9.5}=f(9.5) \approx L(9.5)\).
Você precisa escolher o número ”base” \(a\) de modo que \(x=9.5\) esteja perto de \(a\) e de
modo que você consiga calcular com facilidade e exatidão os valores \(f(a)\) e \(f'(a)\).
Esses dois valores são necessários quando calculamos a expressão de \(L(x)\). Você
consegue pensar em um número perto de \(9.5\) cuja raiz quadrada você sabe
calcular?
xmhintA melhor escolha para \(a\) é \(a=9\). Qualquer outro número para o
qual seja fácil calcular \(\sqrt {a}\) está mais longe de \(x=9.5\). Agora temos que calcular \(f(a)=f(9)\) e
\(f'(a)=f'(9)\).
\[f(9)= \class{xm-answer}{\cssId{xm-answer-1}{\phantom{\rule{7em}{1.5em}}}}\]
\[f'(x)= \frac {1}{ \class{xm-answer}{\cssId{xm-answer-2}{\phantom{\rule{7em}{1.5em}}}}}\]
\[f'(9)= \frac {1}{ \class{xm-answer}{\cssId{xm-answer-3}{\phantom{\rule{7em}{1.5em}}}}}\]
xmhint
Em seguida, temos que encontrar uma expressão para \(L(x)=f(9)+f'(9)(x-9)\).
\[L(x)= \class{xm-answer}{\cssId{xm-answer-4}{\phantom{\rule{7em}{1.5em}}}}+\class{xm-answer}{\cssId{xm-answer-5}{\phantom{\rule{7em}{1.5em}}}}(x-9)\]
xmhint
Agora, temos que calcular \(L(9.5)\).
\[L(9.5)= \class{xm-answer}{\cssId{xm-answer-6}{\phantom{\rule{7em}{1.5em}}}}+\class{xm-answer}{\cssId{xm-answer-7}{\phantom{\rule{7em}{1.5em}}}}(9.5-9)\]
\[\sqrt {9.5} \approx \class{xm-answer}{\cssId{xm-answer-8}{\phantom{\rule{7em}{1.5em}}}}\]
Essa é uma estimativa por falta ou uma estimativa por excesso?
xmhintLembre-se:
\(f''(x)=-\frac {1}{4\cdot x^{\class{xm-answer}{\cssId{xm-answer-9}{\phantom{\rule{7em}{1.5em}}}}}}\).
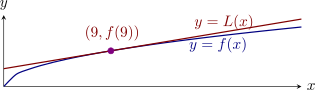
Como \(f''(x)<0\) em \((9, 9.5)\), o gráfico de \(f\) é côncavo para baixo nesse intervalo. [Observação: sabemos
que \(f''(x) < 0\) em todo o intervalo \((0, \infty )\), mas só a parte em \((9, 9.5)\) importa para determinar se temos uma
estimativa por falta ou uma estimativa por excesso.]
Isso significa que \(L(9.5)\ge f(9.5)\).
Essa é uma estimativa por faltaestimativa por excesso porque o gráfico de \(f\) é côncavo para cimacôncavo para baixo no intervalo \(\left ( \class{xm-answer}{\cssId{xm-answer-10}{\phantom{\rule{7em}{1.5em}}}}, \class{xm-answer}{\cssId{xm-answer-11}{\phantom{\rule{7em}{1.5em}}}} \right )\).